We know you are aware that Eucalyptus are non-native, but this also means they have a slightly different biology to other trees, along with certain needs and requirements.
Research has shown that only 25% of hardiness is provided by tree genetics and how we treat your tree in the nursery. 75% of hardiness and success rate is down to how you treat your tree after you receive it! These planting notes have been thoroughly researched and provided to help you give your Eucalyptus the best start in life at its new home.
Young eucalyptus are sensitive creatures – please carry only by their pots.
Please do not handle the eucalyptus by the stems or trunks – it tears the roots and then they die!
Upon arrival, unpack immediately. If they have been delivered in cardboard boxes – DO NOT pull them by their tops out of the box! Cut any plastic strapping with scissors and remove, lay the box flat on the floor and open the flaps completely on the bottom of the box, tear out any pushed in tabs. Holding the pot, gently slide your tree out of its box. If you have a smaller box, then it may open sideways. Pallet crates may require a screw driver and saw to remove timber restraints. With a very tall tree, it is not unusual for us to curl the very top of the tree round in the top of the box, as they are very flexible. The tip will straighten up quickly by itself. New growth is always very floppy.
Water by plunging the entire pot into a bucket for about 30 seconds and then leave to drain.
Stand outdoors in a light airy spot, sheltered from winds.
Keep watered until planted – they need to be kept heavy. Water every day in the summer.
Never leave standing in water. The roots will drown. Eucs are not aquatic!
Never allow the Air-Pot containers to dry out, the trees are certain to go brown and crispy. Keep a full bucket of water close by so you can plunge the pot as required.
If conditions are frosty, move to a very well ventilated tunnel or greenhouse until planted. In winter/spring, only keep inside a house over-night and never for more than one day as your Eucalyptus will come out of suspended animation (type of dormancy) and could subsequently die in a sharp frost. Contact us for details if you need to know more on this aspect.
Plant as soon as possible.
To ensure you have everything you need in advance of planting, read about Tree Support and Protection from Wildlife before you reach for the spade
For each tree you will need:-
Your Hardy-Eucalyptus Tree (based on a 3 or 5 litre tree) – adjust as required for other pot sizes (1)
A 15 litre (3 gallon) waterproof container to soak the tree
At least 10 litres (2 gallons) of clean water
Rootgrow mycorrhizal fungi – see quantity chart below
1 gallon of ready diluted All Purpose Seaweed Biostimulant (2)
20 litres of dry John Innes seed compost OR
20 litres of your own very dry garden soil (3)
Sharp sand or grit (4) – see below
Bark or wood chips – for a 3 litre tree or larger you need 70-100 litres of chips per tree
A means of supporting your tree – see below
A means of protecting your tree from wildlife – see below
1 x garden spade
1 x border or garden fork
1 deck chair plus 1 cup of tea or something stronger as required!
Zero fertiliser is required at this stage
Footnotes from the above:
(1) Adjust quantities of soil, fungi etc. as appropriate to the pot size of your tree. Scale down fungi and mulch when planting a 1 litre Eucalyptus and scale up for larger pot sizes. You need at least 5g of Rootgrow per litre of rootball.
(2) Seaweed Biostimulant. This needs to be the Ecklonia maxima seaweed product (sold as Alg-A-Mic Seaweed Biostimulant) because of the pure auxin and cytokinin content, so nothing else will do. See our website for further details.
(3) Leave it in the garage/greenhouse for a couple of days to become powdery so it will flow easily to fill the gaps around the rootball.
(4) If you have heavy clay soil—mix thoroughly with 2 litres (10% by volume) of very sharp sand or ¼ inch grit. Never use builders or silver sand as it clogs things up!
(5) No compost needed in the planting pit; root tear can happen in dry weather as the compost shrinks.
Rootgrow Dosage Rates
Dosage: (1 heaped teaspoon = approx. 8g) 20 litre pot = 12 teaspoons = 96g
1 litre pot = 1 heaped teaspoon = 8g 30 litre pot = 15 teaspoons = 120g
3 litre pot = 3 heaped teaspoons = 24g 45 litre pot = 16 teaspoons = 128g
5 litre pot = 4 heaped teaspoons = 32g 100 litre pot = 17 teaspoons = 136g
12 litre pot = 7 heaped teaspoons = 56g
Your Eucalyptus may not require support of any kind. It all depends on its growing environment. These trees need a little bit of movement to encourage them to root down properly and also to lay down fibre in the trunk. It’s a bit like us needing to eat apples to stop our teeth falling out! However, what they don’t need is to be thrashed around in a high wind, which will result in them becoming very wobbly and unstable…even falling over. This will be very bad.
Choose the appropriate method from our guide below:
1 litre pot, short tree – does not require any support unless it is the very relaxed Eucalyptus lacrimans, in which case it will require a stout bamboo cane.
1 litre pot, tall tree (over 900 mm tall) – stout bamboo cane slightly shorter than the tree, with arrow shaped cane cap (important to protect the tree trunk from chafing), but only required in windy locations. Remove the cane by the following autumn.
3, 5, or 9 litre pot, short tree – no support may be necessary in sheltered locations. You can leave in the transport cane for one year only (remove it by the following autumn), but shorten to below the top of the tree and re-instate arrow-shaped cane cap (important to protect the tree trunk from chafing, which can be fatal)
3, 5, or 9 litre pot, tall tree (over 900 mm tall) – You can leave in the transport cane for one year only (remove it by the following Autumn), but shorten to below the top of the tree and re-instate arrow cane cap (important to protect the tree trunk from chafing, which can be fatal). It is important to ensure that the tree establishes without suffering root rock, which can lead to socketing and also tearing of the rootplate. This will result in failure to establish well and possibly a slow lingering death. In windy areas, knock a short cross stake into the ground at a 45 degree angle to the normal, avoiding puncturing the rootball. Ensure the tree is blown away from the stake and not on to it, by the prevailing wind. Secure the tree to the stake using soft hessian ‘ribbon’ or in an emergency…ladies’ tights. Do not use plastic or rubber tree belts, they chafe the periderm, which can be fatal…I said they were sensitive creatures! You can also use the ‘H’ section tree support method instead of a cross stake.
12.5L and larger pot sizes – light standards etc. – You can leave in the transport cane for one year only (remove it by the following autumn), but shorten to well below the top of the tree and re-instate arrow cane cap (important to protect the tree trunk from chafing, which can be fatal). It is important to ensure that the tree establishes without suffering root rock, which can lead to socketing and also tearing of the rootplate. This will result in failure to establish well and possibly a slow lingering death. To prevent root rock, support the tree with an ‘H’ section of timbers (100 mm face half round rails screwed together). The structure needs to be knocked into the ground, before putting your tree into the hole, to a depth of around 450-600 mm and protrude above ground by the same amount. Avoid puncturing the root ball – a seriously bad thing to do with Eucs. Secure the tree to the stake using soft hessian ‘ribbon’ or in an emergency…ladies’ tights. Do not use rubber or plastic tree belts, they chafe the periderm, which can be fatal…I said they were sensitive creatures!
20 litre and larger pots, large and heavy duty trees – follow above for 12.5L and larger trees, but in exposed areas you may need to deploy something like a Platipus root anchor system and may be a system of guy ropes. In very exposed areas, it may be necessary to reduce the head of the tree at the time of planting, to reduce the ‘wind sail’ effect (the area of leaf presenting to the wind), until such time as the tree is established. We know it can take 2 strong people to hold a 20 litre Eucalyptus tree vertical in a strong breeze!
Check and loosen all tree ties every spring and again in July.
If you straight-jacket a Eucalyptus to a single, tall standard tree stake or hold it rigid in a triangle of 3 tall tree stakes, it will most likely fall over when the stakes rot. They need to undergo some degree of sway to encourage the roots to anchor down into the soil.
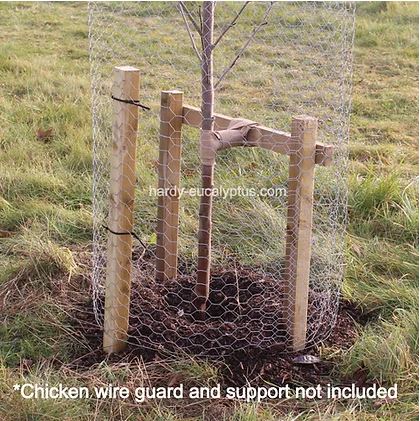
Photo:
H-section tree stake (two posts and cross-beam look like a short ‘H’) with hessian tree belt tied in a figure of 8.
Chicken wire rabbit/deer guard held away from the tree and supported on another stake with cable ties.
Ring of bark chip to protect roots and prevent grass/weed encroachment – a few inches thick but does not mound up on tree trunk.

Deer, hares and rabbits will all browse Eucalyptus and strip their bark. Eucalyptus glaucescens is the only species that successfully escapes this vandalism. To protect your trees, encase in chicken wire mesh to the desired height (wildlife height dependent) supported on sturdy tree stakes. The diameter of the circle needs to be no smaller than 450 mm (18 inches). Alternatively, you will need to ensure that the whole of the Eucalyptus plantation area is wildlife-proofed. N.B. Avoid using plastic tree shelters and tree guards. Such protective guards can cause winter-resting Eucs to start into growth on warm winter days. This soft leafy material then gets badly singed in subsequent frosty conditions and can be fatal.
1. Prior to beginning work on planting, decide on your chosen method of tree support and protection – have them ready to use.
2. Fill a 10 litre (2 gal) bucket with clean water and soak your tree rootball for 20 minutes. If your Euc has a large pot, use a dustbin and fill with water as required, to cover the top of the pot.
3. Dig a hole 100 mm (4 inches) wider in diameter & twice as deep as the pot. Then, fork over the bottom of the hole, adding ¼ of the dry soil and sharp sand mix and refill the hole until it is the same depth as the pot. Loosening this much soil in the bottom of the hole allows the new roots to quickly go down and estblish a stonger root system which will make the tree more wind and frost resistant.
4. If the ground is dry-ish, pour one gallon of water into the hole and allow to drain away.
5. Place the tree (still in its pot) into the hole and check the depth is just about right. Adjust accordingly as required. Please bear in mind that there is a recessed base plate in the pot, which will make the rootball appear deeper than it is in reality.
6. Take the plant out of the hole, lie the tree down on its side. Unscrew the top green screw & remove. On a large pot—repeat with the bottom screw & remove. Gently uncurl the pot from around the rootball, taking care not to break any major roots. DO NOT ‘ loosen up’ or destroy the root ball! This will be fatal.
7. Remove the bottom pot disc; the odd peripheral root dropping off at this stage is ok.
8. Check depth of hole a second time, against the rootball. If you have to amend the depth of the hole, cover the rootball with hessian or polythene to avoid desiccation. Roots can dry out within minutes on windy days.
9. Install appropriate tree support as best practice.
10. Scatter the recommended amount of rootgrow in the bottom of the planting hole. See sachet for further details. The Eucalyptus roots need to be in contact with the rootgrow powder.
11. Gently place the tree into the centre of the hole such that the root collar (where the trunk joins the roots) is 25 mm (1 inch) below finished ground level.
12. Pat more Rootgrow on to the sides of the root ball.
13. Back fill around the root ball with the dry soil /sand mix. Firm down with your fist (not a size 11 wellie), ensuring there are no air pockets.
14. Water in using the rest of the water.
15. Remove all grass & weed competition in a 900 mm (3 ft) diameter circle around the tree.
16. If you are able to install irrigation, do so at this point. We recommend a ring of ‘leaky hose’, or 2-3 dripper nozzles for larger rootballs, or if your tree is for cropping e.g. cut foliage, install irrigation anyway regardless of pot size. See watering notes below.
17. Dress the cleared area with 150 mm (6 inches) depth of bark chips to protect the roots. This is very important – please do not skimp. Bark acts as a winter root duvet and a summer water conserver.
18. Avoid mounding bark up around the trunk—make it like a Polo mint, with a hole.
19. Speak kind words to your tree and give yourself a pat on the back, before sitting in a deck chair, with a drink, to admire your handiwork :-)
Tailor the quantities of water to your soil type and local rainfall. Sandy soils obviously require more water than soggy clays. Windy weather strips moisture from Eucs and damages the leaves, so newly planted trees will need supplementary watering support during breezy conditions. If the tip of your tree is bent over like a shepherd’s crook (not just casually lolling around) and the leaves are flaccid, your Euc. needs watering. Administer the recommended volumes listed below in one dose.
March, April and May:
water only if the spring is dry.
1 litre pot size – 2.5 litres (0.5 gallon) per week each
3 to 9 litre pot size – 5 to 10 litres (1 to 2 gallons) per week each
12.5 – 20 litre pot size – 5 to 10 litres (1 to 2 gallons) per week each
30 to 45 litre pot size – 10 to 15 litres (2 to 3 gallons) per week each
100 litre pot size – around 15 to 20 litres (3 to 4 gallons) per week each
June, July, August and September: this is when Eucs do nearly all of their growing –
they go completely bonkers in August, so ensure maximum water at this time.
1 litre pot size – 2.5 litres (0.5 gallon) twice per week each
3 to 9 litre pot size – 5 to 10 litres (1 to 2 gallons) twice per week each
12.5 to 20 litre pot size – 5 to 10 litres (1 to 2 gallons) twice per week each, more if hot & windy
30 to 45 litre pot size – suggest drip/leaky hosepipe irrigation to deliver 10 to 15 litres (2 to 3 gallons) two to three times per week
100 litre pot size – suggest drip /leaky hosepipe irrigation to deliver 15 to 20 litres (3 to 4 gallons) at the rate of two to three times per week
Set the system to deliver the irrigation to the outside edge of the original rootball
October to February:
If dry, cold and windy only, no water support will be required if very wet or snowing
1 litre pot size – 2.5 litres (0.5 gallon) twice per month
3 to 9 litre pot size – 5 to 10 litres (1 to 2 gallons) twice per month
12.5 to 20 litre pot size – 5 to 10 litres (1 to 2 gallons) twice per month
30 to 45 litre pot size – around 15 litres (3 gallons) twice per month
100 litre pot size – around 20 litres (4 gallons) twice per month
It may not be practical to water large scale plantings after year 1, so first class care will need to be given in year 1 to ensure good establishment
March, April and May: no watering required unless there is a freak drought
June, July, August and September: half of year 1 rations
October to February: no watering required
For your Eucalyptus to be successful, there should be zero competition from grass, weeds or other planting, for the first two years after planting. This is non-negotiable from the tree’s point of view and must be adhered to. If using herbicides for weed control, avoid getting spray drift on to any part of the Euc., including the base of the trunk. It will be fatal as the herbicide can penetrate the young, delicate periderm (like bark, but isn’t!).
Maintain the 150 mm (6 inches) depth of bark chip mulch in the 900 mm (3 ft) diameter circle around the base of the tree, for a further couple of years, to assist with full establishment.
Sulphur chips: There is good evidence that Eucalyptus respond very well to the addition of sulphur chips scattered around the tree prior to mulching. Sulphur helps acidify the soil. This is worth pursuing if you have alkaline soils. Administer every April for the first two years after planting, especially if you are growing the monocalypt section of Euc.s. This includes Snow gums (E. pauciflora, E. lacrimans and E. gregsoniana), E. stellulata and E. delegatensis Purchase sulphur chips from your local garden centre or online. Always adhere to manufacturers recommendations especially on dosage.
Chelated Iron tonic/ Sequestered Iron: Not as essential as Rootgrow, but chelated iron helps young Euc.s establish in alkaline soils. Worth administering every April for the first two years after planting especially if you are growing Monocalypt section of Euc.s.
This includes Snow gums (E. pauciflora, E. lacrimans and E. gregsoniana), E. stellulata and E. delegatensis.
Purchase chelated iron from your local garden centre or on line. Always adhere to manufacturers recommendations especially on dosage.
High potassium (potash) feeds – the K in the NPK ratio. Administer in August for the first couple of years after planting. Potassium helps young Euc.s to ripen their wood; to harden up all that quickly produced springy wood, prior to the onset of winter. Ripe wood is hardier and therefore more resistant to damage by frosts and cold biting winds.
High Nitrogen foods – don’t go there! Its the horticultural equivalent of crack cocaine. It will make your Euc. hyperactive, ill and then it will fall over! Nitrogen encourages sappy growth which is prone to frost damage.
Many of our trees are sent out with lower side branches; these are called feathers. Please resist the urge to tidy these up by pruning them off; they are important as they feed into the trunk and build stem collateral. Premature removal of feathers weakens the trunk. When your tree has had enough of them, they will turn brown and stick-like and drop off….that’s when you can prune them off!
As a matter of good practice, remove any odd branches that are damaged, by cutting back cleanly to healthy material.
For advice on shaping your standard tree, pollarded or coppiced stock, firewood production, hedge-screen or multi-stem, please refer to our website www.hardy-eucalyptus.com for further information. For cut foliage production, refer to our specific growers manual under Sundries.
Every year, in the spring, your Eucalyptus will under go a change of foliage. The old leaves will be shed and new foliage produced. To do this, the tree sucks out all the stored nutrients in the old leaves, held on the lower part of the young tree. These go spotty, get black spots, turn beige/biscuit/red/yellow/brown or all of this and then drop off. This is completely normal. Lower branchlets may go brown and sticky, at which point you can cut them off.